FAQs
The cost of a shirt or an order depends primarily on four things.
- What kind of garment you are ordering
- How many garments you're ordering
- How many locations you want to print on
- How many colors are printed on each location
To request a quote, you can visit our Contact page, contact one of our locations.
You can pay for your order at the time your order is placed with cash, check, or credit card. Personal checks are accepted. You will be sent a confirmation e-mail with a payment link.
Yes! Please contact a store or sales representative for more details and to set up an account.
Absolutely ! Just send us your contact information and a customer rep will call you.
Absolutely! We will send you an artwork approval to look at which you can approve or decline. We will not print without your approval. You can also use our Design Studio to mock up a shirt before you even place an order.
Whenever you need them! Tell us your due date and we'll make sure they arrive on time. (note: not all products are available for orders required in less than 5 business days.) Contact us if you have questions about your due date!
Not at all - you have options! First try our Design Studio to start. Still can't figure out your design? Our in-house graphic art department can work with you to make your vision a reality. Whether you're working with vector-based artwork or a doodle on a napkin - we'll make sure you're happy with your shirts.
We can handle any file type, but we prefer Adobe Illustrator files. If submitting a raster file (.psd, .jpg, .gif), we prefer high resolution. The higher the DPI (dots per inch) the better.
When you send information via a form on a website, your browser automatically creates a temporary session variable to store this information for easy recovery by the user. This can be taken advantage of by malicious users. To prevent this, we associate a unique id with the session. This prevents anyone from being able to access the information in the session variable without the proper authorization. As a further measure of security, we have an SSL certificate setup that encrypts the user's information. That way even if someone were able to gain access to the session variable, they would not be able to decipher the information in it. In order to be more secure, we recommend that users install a security suite from such companies as BitDefender, Kapersky, AVG, McAfee, or Symantec. These software suites will help keep any information that your browser stores locally, safe.
Listed below are some of the main brands we use with direct links to their corporate websites.
DESIGNING QUESTIONS / ISSUES
To the left of your tee in the Design Studio, there’s a “Select Print Location” button. Clicking this will allow you to select the back of the garment or switch to the left front chest. 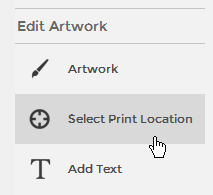
Select the text as you would an image, and a bounding box should appear around it. Pull the blue dots at the corners of the box and adjust to the desired size. Use a corner dot if you wish to keep the design proportions consistent. 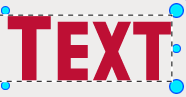
We do offer name and/or number personalization! The price for this is $5 per name and $3 per number. Unfortunately, the Design Studio does not support personalization at this time. To add names and numbers, you will want to contact your sales manager. If you do not know your sales manager’s email, just email info@moxiart.com and our customer support team will route you to the correct place! In the meantime, feel free to complete whatever design will be the same on all of your tees.
Definitely! Once you have a text box open, you can view the font drop-down menu to the right of your shirt image. Hit the downward-pointing arrow to reveal a second drop-down menu directly beneath the first (it should read “College” in Arial font). Select the downward-pointing arrow in this box to reveal our list of font types. Each type will offer you a whole new selection of fonts to choose from!
You can have up to 4 different print locations, including sleeve prints and back tags! Unfortunately, our Design Studio only supports front and back designs. If there is artwork or text you would like on a location aside from the three provided, just email us specific instructions once the rest of your shirt is designed. A sales manager will then be able to adjust your order and get you started!
Yes, but we suggest you place all your images and text inside the red box and submit for a quote. A sales manager will soon be in touch to go over your design and work out specifics. We will not print your order without your approval!
Not at all! While our Design Studio is a great tool, we understand that you may need some help getting your final design just right. Our sales managers and design team review all artwork, and make suggestions and recommendations. You can even put in placeholders for logos or other images, and email the logos directly to us.
To upload your image, select "Upload Image” > “From [Computer or Mobile].” This will generate a preview and allow you to remove all white from your image, or remove the white background. You can also select how many colors are in your image. Once you like it, click “Continue.”
On the next page, you can swap out the "Current Color" for a different one by clicking the "Select Color" button. Choose the replacement color. Also, if you want one of the colors to be the shirt color underneath, select the "Transparent" option by clicking the "X" to the right of the color in the preview.
On the next page, you can swap out the "Current Color" for a different one by clicking the "Select Color" button. Choose the replacement color. Also, if you want one of the colors to be the shirt color underneath, select the "Transparent" option by clicking the "X" to the right of the color in the preview.
To upload your image, select "Upload Image” > “From [Computer or Mobile]”. Then select the number of colors you want to have in your image. This will generate a preview. Above the preview, select the “Remove White Background” button for white backgrounds. For other colors, you can also hover over the preview with the Eyedropper Tool. Simply click on colors to remove them.
Select the image you wish to make transparent. On the right side of the Design Studio, all the colors in that image will be listed. Select which color you want transparent, and choose “Transparent” from the color menu. If the Design Studio doesn’t allow this or work quite right, don’t worry, we can modify it later! 
The most common way to achieve these effects is to add one of our Distress Effects to your design. “Distress Effects” are located in the “Edit Artwork” section to the left of your tee.
Our design studio is sometimes particular about .pdf files and images over 2MB in size. If possible, try to submit a .jpg or .gif. If this still does not work, email your images to info@moxiart.com with your order details. From there we can quote you a price and place your order manually.
Just email info@moxiart.com and attach the problem file(s). Include as many details about your prospective order as possible, and from there we can quote you a price and place your order manually.
Create your concept as best you can online, and we can handle the rest. While our Design Studio is a great tool, we understand that you may need some help getting your final design just right. Our sales managers and design team review all artwork, and make suggestions and recommendations. You can even put in placeholders for logos and email those to us.
PRODUCT QUESTIONS
Yes, we have many other products available, but we don’t show them all so that our catalog isn’t overwhelming to our customers. If you have something specific in mind, let us know, your sales manager can help navigate this. You can always create your design on ANY product, and we can produce that design on any other product. If your product is not in our catalog, it will not slow up your designing process.
Put your design on a similar product (or in the case of promo products, any product), in the red box. We can take your design and move it to any product.
In the design studio when you click on a product's details you can see a sizing chart.
CREATING AN ACCOUNT / SAVING A DESIGN
Have you created and saved a design yet? If not, then you won't show up here:info@moxiart.com
Once you create a design, it takes a couple minutes for it to process and load in our systems. Just wait a minute, and try again!
GETTING A QUOTE / PLACING AN ORDER
Absolutely! Just email info@moxiart.com and include as many details as possible including your location (city/state), when your event is happening, and how many shirts and ink colors you’ll need.
Absolutely! We will not print your saved art without sending it back to you and first getting your approval. That means if you can't get something to look right online there will be more chances to make changes and tweak things. We will send you an artwork approval to look at which you can approve or decline.
First you will need to get pricing. Login to your account to view your saved designs*. From there, pick the design you want to order, and enter in a few pieces of information to get your quote.Click here to visit our tutorial on how to get a quick quote from a saved design
Once you have your quote, you can click the “Place Order” link to get your order started. If you aren’t quite ready to place your order right away, no problem. You will be sent an email with your quote number and pricing information, and you can always come back to that to place your order.Click here to visit our tutorial on How To Place an Order
Once you have your quote, you can click the “Place Order” link to get your order started. If you aren’t quite ready to place your order right away, no problem. You will be sent an email with your quote number and pricing information, and you can always come back to that to place your order.Click here to visit our tutorial on How To Place an Order
Sometimes our Design Studio cannot determine exactly how many colors are in a design when you upload a logo. In that case, use your best judgement to determine the number of colors, and we will double check that when moving forward converting your quote to an order.
QUOTES
Check out our handy guide “What Makes An Order”.
Absolutely! After you load your first product and add in product color and quantity, just click the “Compare Price” button and select “At a Different Quantity”. We don’t recommend comparing more than 3 or 4 products, otherwise it can get confusing. 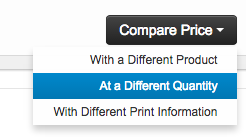
Absolutely! After you load your first product and add in product color and quantity, just click the “Compare Price” button and select “With A Different Product”. We don’t recommend comparing more than 3 or 4 products, otherwise it can get confusing. 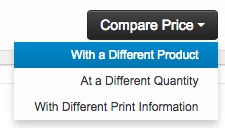
Load your first product and add in product color and quantity, just click the “Compare Price” button and select “With Different Print Information”. We don’t recommend comparing more than 3 or 4 products, otherwise it can get confusing. 
Absolutely. First confirm that your your garments can print together by reviewing our “What Makes An Order” guide. Load your first product and add in product color and quantity. Then, click the “Add Another Product” button and select either “Same Product - Different Color” or “Different Product”. 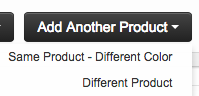
There is something about this quote that requires one of our managers to take a second look. It could be something regarding the product, the artwork, or location. No matter the issue, don’t worry, we will be getting you a quote right away!
Unfortunately, these need to be separate quotes, because eventually these will be separate orders.
This would be done with two separate quotes. When these become orders, they will be separate orders.
GARMENT CARE
The tags on the inside of your garments contain helpful instructions for laundering your apparel. But those instructions are intended primarily to protect the fabric and stitching of the garment itself. They don’t necessarily tell you how to look after your custom imprint or embroidery.
Once you’ve customized your apparel with your own unique design, you’ll also want to keep that design looking new and vibrant for as long as possible. You can help make that happen with the tips below. Additionally, see the other sections on this page for tips specific to digital printing and embroidery.
Once you’ve customized your apparel with your own unique design, you’ll also want to keep that design looking new and vibrant for as long as possible. You can help make that happen with the tips below. Additionally, see the other sections on this page for tips specific to digital printing and embroidery.
- Turn garments inside-out before washing and drying.
- Machine-wash at as low a temperature and as gentle a cycle as possible.
- When machine drying, use a lower temperature if possible. Air drying is even easier on imprints.
- Don’t iron directly on the print or custom-embroidered areas.
- Avoid bleach and other harsh detergents.
- As always, follow any other care instructions on the garment tags.
- Digital prints are durable but are more liable to fade from wear compared to screenprints. So it’s especially important to launder with care.
- Again, turn inside-out before washing and drying.
- Machine-wash in cold water only.
- Lay flat to dry & avoid machine drying.
- Tumble dry low heat if machine drying is required.
- Do not iron the imprint.
